
Well, I opened the box, and found that the switch was
connected to absolutely nothing, it was simply sitting in the box filling
space. In fact, I wondered if my neighbor, who has the same floor plan only
reversed, had a dual gang box in their hallway. In fact they only have one
switch, so I guess someone changed their mind in the initial wiring plan, after roughing in our electrical. This discovery did start to make me wonder,
after years of not caring about the switch, what could be put in its place that
would be useful. Since there is power to the box, I thought maybe I could put a
smart switch in the box with no load attached, but program it to do something completely of my choosing. I had lots of ideas
of what would be handy, after all this is the door we use when leaving the house
when we are driving somewhere, so various ideas went through my head. In fact,
I had several ideas, and wondered how I could accommodate more than one
function in space of one switch. I
looked for multi-function programmable switches, and no one seems to have
develop anything specifically for this, but I was aware of a ceiling fan switch
that had two main buttons, one for the light and one for the fan. In addition, it had an up and down arrow for
dimming and fan speed, which I wondered if I could also program for additional functions.
The specific switch I found was the Treatlife Smart Ceiling Fan Control and
Dimmer Light Switch. I know it seems
like I have been plugging Treatlife switches in my two blog posts, but really
it is a coincidence. If you find another
brand out there, Gosund appears like they may have something similar, but it
doesn’t have physical separate switches, instead it has sliders. Now installing as stated before is pretty
simple for Smart switches, basically just like a normal electrical switch,
except you need a neutral wire, and the space it takes up in the box is much
larger than a normal switch. Once it is
installed and the power turn back on you will add the switch in the Smart Life
app (coincidently since I have other Gosund products it would also be in the
Smart Life app) then it is available to use.
In addition to adding in the Smart Life app, once it has been added it
should show up in either Alexa or Google Assistant almost instantly, which ever
is your preferred platform.
Now to the fun stuff, how do I make an otherwise useless
switch do what I want. My plan for the
two buttons is to have them turn on or off several different lights. The bottom button on the switch I wanted to
be my, “I’m leaving home” command and the top button be my “I’m home”
command. Incidentally, when I named the
Smart Switch in the Smart Life app I called it “Command and Control”, not just
because it sounds cool, and I can remember which one it is, but also, so it
wasn’t something close to any other switch name, so as to not confuse Alexa or
the Google Assistant later, when trying to control other lights by name. This switch will never be controlled by name
by either assistant but will show in the assistant as part of its normal auto
discovery process, and if you have a lot of smart home devices that you control
by voice, it is best to pick a name that is totally different than anything
else. Other than setting up the
automation, no one other than me needs to know its name.
This by the way is a good rule
of thumb for all your device, try to avoid calling any of your switches “Living
Room Light” and another “Living Room Lamp” as this will invariably make it
different for the assistant to discern which you mean. I have “Living Room Light” and “Buffet Lamp”
as an example.
Now getting the smart switch to do what I want can be accomplished
two different ways. If all the other
smart switches, bulbs etc. that you wish to control are tied in to the Smart
Life app then life is fairly straight forward. If they are not, then option B will be covered in a future post, which is likely your only choice, and involves IFTTT.
Use the Smart Life App (a.k.a. Option A)
First the concept of what we are doing here is essentially
creating a scene, and then having the physical button on the switch initiate
that scene. Now one tick is that the
smart switch button whether a single button or a multi button as in my example have
two states, on and off, even though we are treating the button click like the
same command, regardless of what the switch thinks its state is. One is the
“On” state and the other is the “Off” state, so we are going to have to create
two automation that initiate the scene. Let’s get started.

1. In the Smart Life app (it is the same for Android or iPhone),
we see all of the switches we have added to our network. First, select the
Smart icon in the tray
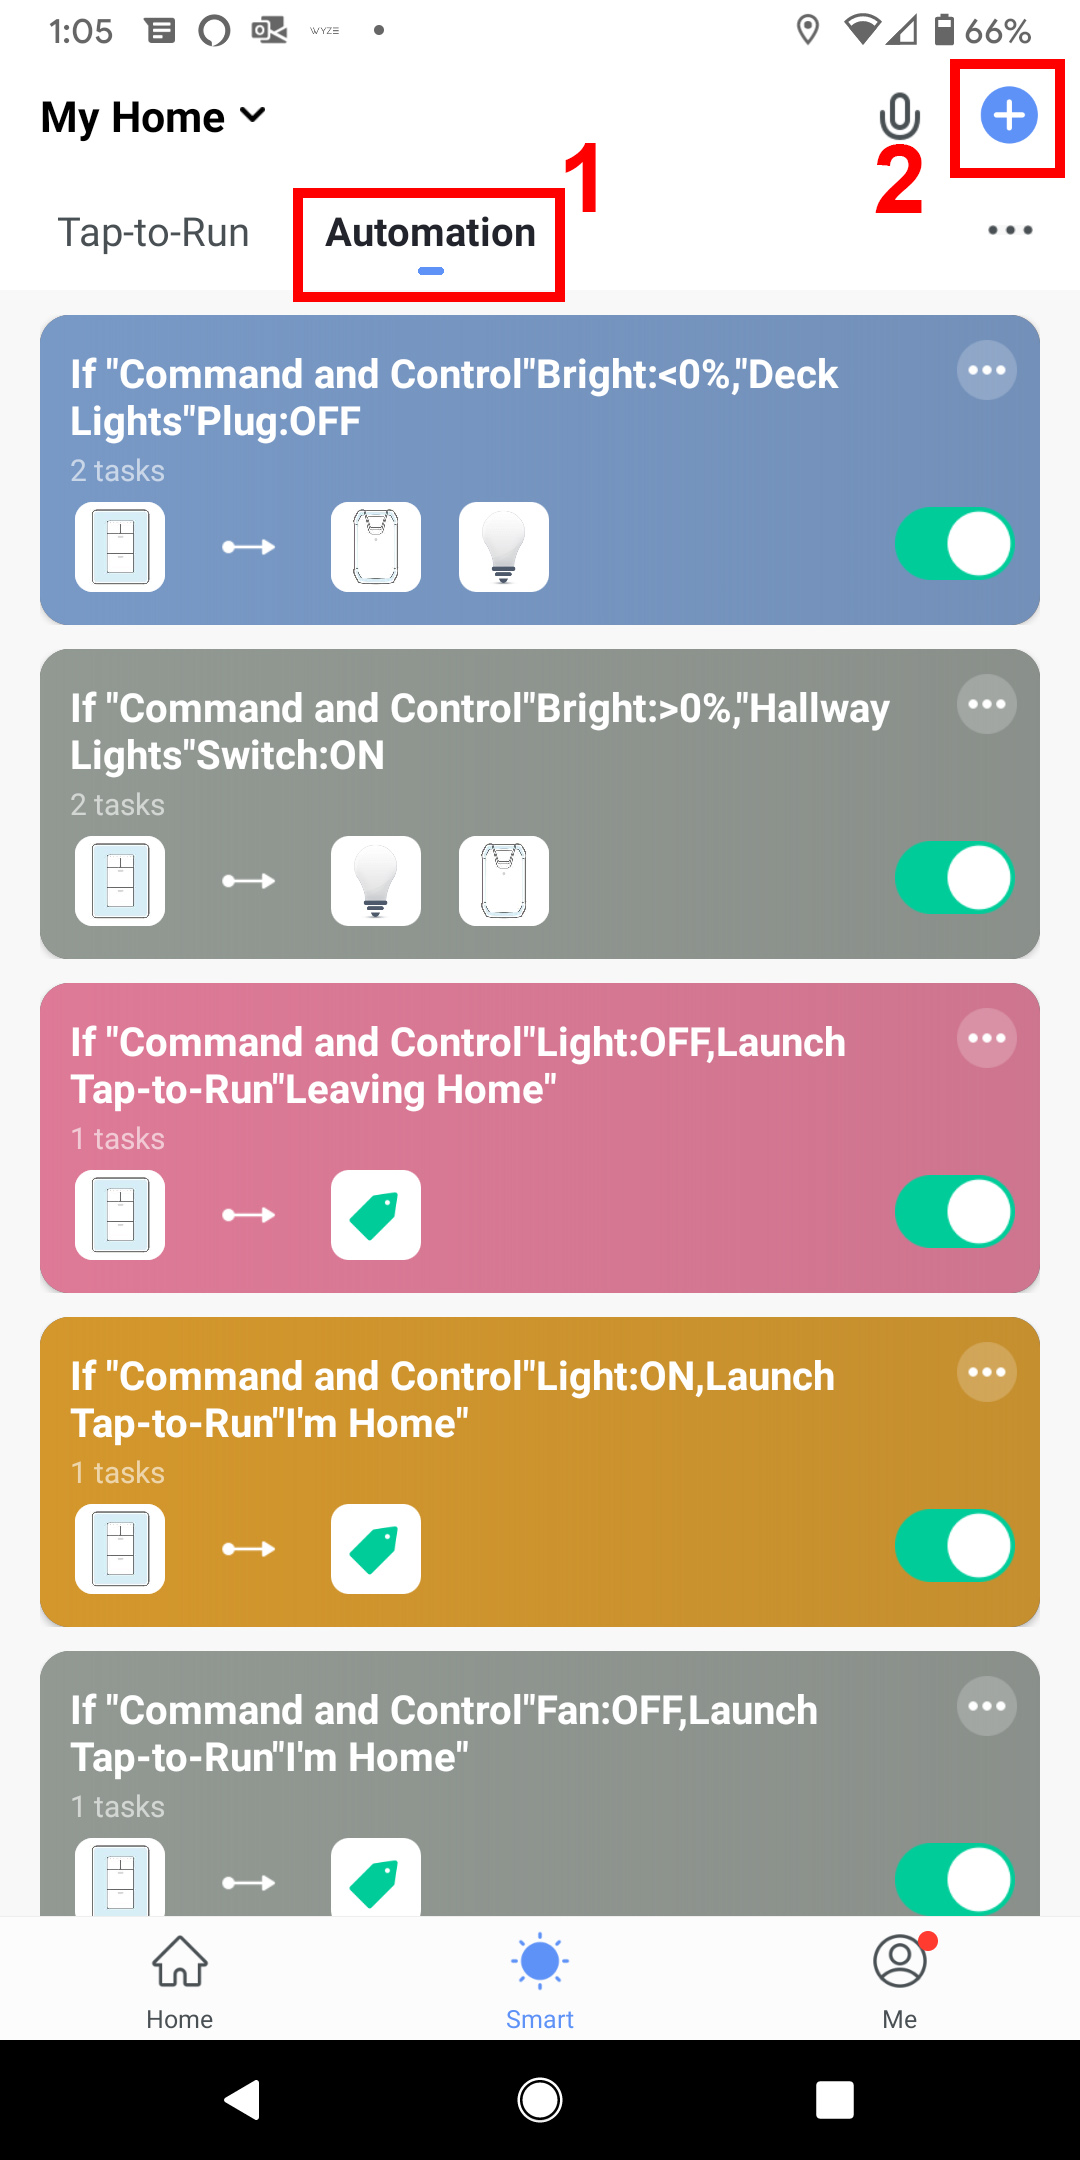
2. Next, click the Automation option and then the + sign to
create a new automation

3. Now, select the “When device status changes”.

4. Then select the device, in this case a switch, from the list. In our case we named it "Command and Control"


